Discover all the perfect Hyderabadi Chicken Dum Biryani recipes on the net in the one cease site that is cooking information. Whether or not you're on the lookout for an impressive appetizer, an elaborate meal, or a quick and easy Hyderabadi Chicken Dum Biryani , you can find the recipes and advice you want. We provide you only the best Hyderabadi Chicken Dum Biryani recipe here. We also have wide variety of recipes to try.
Before you jump to Hyderabadi Chicken Dum Biryani recipe, you may want to read this short interesting healthy tips about In This Article We’re Going To Be Taking A Look At The A Large Amount Of Benefits Of Coconut Oil.
In this day and age of individuals are trying to live a healthier life and you are going to find that the usage of coconut oil will assist you to accomplish this. Something else I would like to point out relating to this product is that there are plenty of different benefits available from it. There is one more thing that’s important to realize about this product and that is the fact that it can benefit you when you use it both internally as well as externally for your body. Coconut oil is much more beneficial than other oils you are able to purchase and on this page we will be telling you why.
One more thing a large number of people would never do with any traditional types of vegetable oils would be to use this directly on their skin, nevertheless this is recommended when it comes to coconut oil. For folks who end up suffering from different kinds of rashes you may possibly want to think about rubbing coconut oil on your skin as this will assist you to heal the rash. There are other benefits of using this on your skin such as the fact that it can supply you with a younger look and it is also loaded with antioxidants that can be absorbed in the skin.
There’s currently studies being done that are leading individuals to the realization that coconut oil can also fight off bacterial and viral infections within the body, however this is not yet been proven. One of the best things you are going to be able to do for your body is to start using coconut oil as opposed to the other oils that you might be using at this current time. There’s no doubt that in time businesses will be promoting coconut oil supplements, nevertheless now that you are aware of the benefits this is something you can start using today.
We hope you got benefit from reading it, now let’s go back to hyderabadi chicken dum biryani recipe. To cook hyderabadi chicken dum biryani you only need 21 ingredients and 7 steps. Here is how you achieve it.
The ingredients needed to cook Hyderabadi Chicken Dum Biryani:
- Use 750 gm chicken
- Take 1 1/2 kilo Extra long Basmati Rice
- You need 4 tbsp ginger garlic green chilli paste
- Take 1/2 cup yoghurt
- Use 1 lemon squeezed
- Take 1 1/2 tbsp garam masala powder
- You need as per taste Salt
- You need 1 1/2 tbsp kashmiri red chilli powder
- Take 2 teaspoon haldi powder
- You need 1/3 cup mustard oil
- Prepare 5-6 tbsp Shahi Biryani Masala powder
- Get 1 bowl mint leaves
- Use 1/2 bowl coriander leaves
- Prepare 2 pieces Javitri, star anise
- Provide 1/2 cup lukewarm milk
- Provide 1 bit of kesar
- Take 1 pinch Yellow/orange food colour
- Take 5 drops kewra essence
- Prepare 3 drops mitha itar
- Take 10-12 onions finely chopped for birista
- Use as required All-purpose wheat dough for dum
Steps to make Hyderabadi Chicken Dum Biryani:
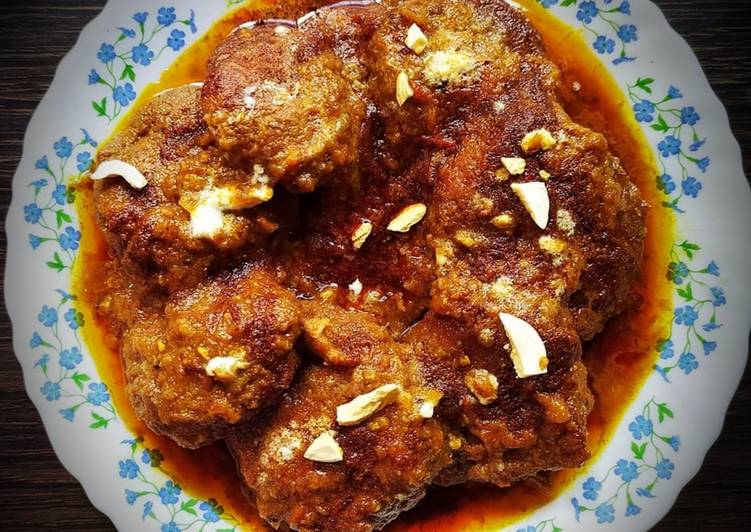
- First step: - Marinate the chicken overnight. Here I took 750 grams chicken. So I put 4tbsp garlic-ginger-green chilli paste, 1/2 cup yoghurt, 1 lemon juice, 1 and half tbsp garam masala powder, salt as per taste, 1 and half tbsp kashmiri lal mirch powder, 2 teaspoon haldi powder, 1/3 cup mustard oil, 3½tbsp shahi biryani masala powder, 1 small piece javitri, 1 bowl of mint leaves and 1/2 bowl of coriander leaves. Then let it rest overnight or for 4 to 5 hours maximum in refrigerator
- Second step: - take 1/2 cup lukewarm milk and add 2 pinches of Kesar in it. Also add just 3 drops of Kewra essence in the kesar milk and Yellow/orange food colour in the kesar milk. Keep the mitha itar ready too (separately). Also fry sufficient onions until they turn golden brown (I.e Birista). Keep all this ready before proceeding further
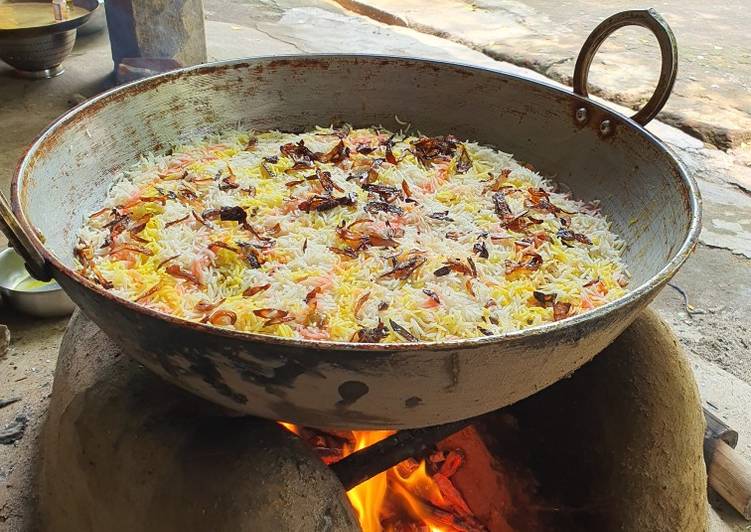
- Third step: - Soak extra long Basmati rice India gate by adding 1 Big elaichi, 2 small elaichi, 4 Cinnamon sticks, 10 whole black peppercorns, 1 piece javitri, 1 star anise, 5-6 cloves. Let it rest for 1.5 hours. - Then boil the rice by adding a bit more water. Also add salt while boiling. The salt should be a bit more as the water will be ultimately drained out.
- Remember the rice should not be entirely cooked. Just switch off the flame after the water comes to two boils. The rice should only be 70% cooked, not entirely. - After that add cold water immediately and drain all the water. Cold water is added so that the rice doesnt get stuck to each other.
- Fourth step: - In a container add ghee at the base and then place marinated chicken entirely. Add half boiled aloo (optional). The base should get covered by chicken and aloo entirely. Then add most of the Birista (and keep some for garnishing later). Now comes the first layering of rice. Start layering the rice and add a bit of kesar milk (I.e with yellow food colour and kewra), sprinkle a bit of mitha itar sprinkle 1 teaspoon of biryani masala. Prepare the second layer in that way too.
- Make the second layer of rice, sprinkle a bit of mitha itar, kesar milk again that has yellow food colour and kewra, sprinkle 1 teaspoon of biryani masala. Then finally add all the birista on the top of the rice and 2 tbsp ghee. - After that cover the lid with a container and seal the sides with atta dough so that air can't pass. - Now cook the biriyani in medium low flame for 15 mins and then place a tawa on the stove, place the biryani container on the tawa and cook in low flane for 45 mins
- I had Chulha as you can see in the picture so I did not place any tawa I just reduced the flame. Switch off the stove and dont open the lid for 10 mins. - Open the lid now. Your hyderabadi dum chicken biryani is ready😍😍
If you find this Hyderabadi Chicken Dum Biryani recipe useful please share it to your close friends or family, thank you and good luck.